Check Mk Create Own Special Agent

Contents
Contents
Quite often I am using Check-MK system monitoring (in place of Nagios), mostly because it has quite nice defined custom plugin interface, but not quite good documented in more advanced aspects. In this blog post I will focus on how to wrote your own Special Agent plugin type, so let’s dig around of it!
1 Why Special Agent ?
If we want to write a custom check, first we have to provide to check-mk server monitored data, there is a few option to do that:
- Agent Based Checks (https://checkmk.com/cms_legacy_devel_agentbased.html) - simply, create script in
/usr/lib/check_mk_agent/plugins/on the agent side, which outputs data in section<<<yourCustomCheck>>>. When check-mk server asks agent for data by connecting to client on 6556 port, the script will be executed and output delivered to check-mk server for processing by your custom check, on the server side. - Custom datasource - there is an option to create custom datasource program/script in any language, which will be invoked instead Agent. It can be done by rule in
Host & Service Parameters -> Individual program call instead of agent access. This approach has some disadvantages, when we use it, the Agent on the monitored host would not be invoked, so Agent Based Checks will not be working (the build in Agent Based checks as well would not work), what is more, in this case we can call only one datasource program for monitored host. - Piggy back (https://checkmk.com/cms_piggyback.html) - very nice mechanism, which is used for example in vSphere plugin. In short, one of monitored host, can deliver data for checks for another monitored hosts. This approach is very well documented, so i recommend to read the documentation. The main disadvantage is that we need separate host which doing checks an return data for another hosts - in some cases it works well e.g. mentioned earlier vSphere plugin but in some we need something more.
- Special Agent (https://checkmk.com/cms_datasource_programs.html#specialagents) - most powerful mechanism, but also most not documented one :). If I would have to explain what is Special Agent, I would say that this is Agent Based Checks with non-limited custom datasources approach. In this blog post I will show how to write and register that type of agent.
2 Datasource for Special Agent
To create custom Special Agent, there is a some steps to create one. First we need create a script which will be our datasource,
it provides data for our custom checks. Datasource script of our agent have to be placed in folder: local/share/check_mk/agents/special.
Filename for that agent also must be special, I mean it has to follow schema: agent_agentName in my case: agent_myspecial, below is simple code for my Special Agent:
|
|
The code is straightforward, my script expects to get IP address and port via params, then it try to perform GET request on that IP and port. At the end, it print to stdout response code for that request.
3 Register Special Agent
Next step which has to be taken is registering agent_myspecial script as a datasource for our Special Agent.
It has be done by creating in local/share/check_mk/web/plugins/wato a file for example myspecial_register.py with piece of code as below – filename in this step does not matter:
|
|
There is a some structures which has to be imported to register custom datasource, I commented most important parts of the code.
After save this file, check_mk server has to be restarted to read our custom files, if everything went well, when we go to
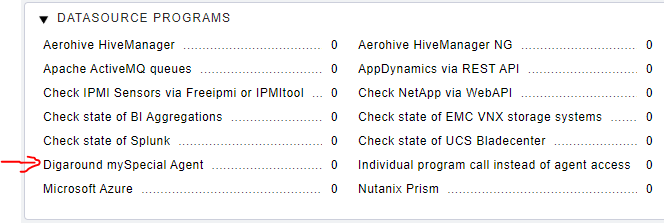
Host & Service Parameters -> Datasource Programs we can see that our Digaround mySpecial Agent is registered and visible on the list:

Registered Special Agent
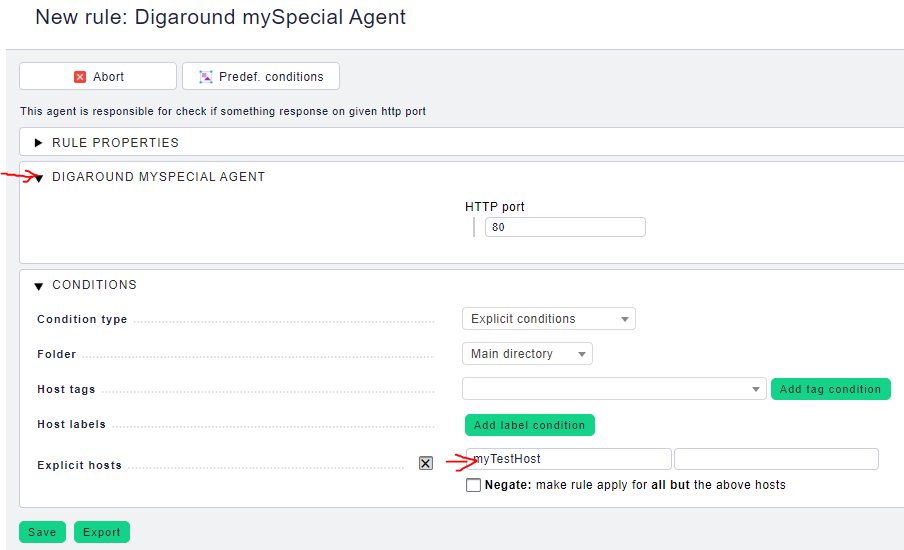
Now we can click, and create rule for agent to activate it on the test host:

Create rule for host
4 Invoke Special Agent
Created rule does not cause that mySpecialAgent will be automatically invoked, first we have to register “invoker” for agent.
It can be done, by create file agent_myspecial in local/share/check_mk/checks.
Note
|
|
In this case code is quite simple, we define function which gets parameters form check_mk environment and prepare arguments which has to be passed to our agent while executed.
Next, defined function is registered for our agent – myspecial in dictionary special_agent_info.
5 Create custom check:
Last step in our journey is create some custom check, to consume data from our custom special agent and alert if condition are meet. If someone creates custom check for check_mk daily I think the code is self-explanatory, in short check takes return code passed by our special agent, checks if it is 200, if not alerts.
|
|
After save this file in local/share/check_mk/checks/myspecial_response_code, reload check_mk server. Check_Mk Discovery check should now report our custom Myspecial Response check, if we add it
we should see it works!

Create rule for host
6 Conclusion
Special Agent are quite powerful feature in Check_MK, it can be used to write really complicated checks which has to gather data from strange sources. I hope explained well how to create one if some non-standard requirements shows. One thing worth mention, above tutorial works in Check_MK line 1.6, keep in mind also that 1.7 release is coming, where authors announced some big changes in custom check interfaces - so probably code above will require some tuning then. Anyway if you want simple bootstrap to write you own Special Agent take a look my github , where you can browse code above.